Google Drive is a cloud storage platform that stores your necessary files and folders. It also allows you to synchronize the storage from your computer, mobile, and laptop devices. In some cases, Google Drive Not Syncing on Windows 10 Operating System that you are using.
Various reasons can cause this problem and prevent Google Drive from syncing. Blaming one particular reason will be a difficult task as we don’t know the exact reason due to which Google Drive not syncing. We will now look upon various troubleshooting steps that will solve the issue.
Table of Contents
Steps to Apply when Google Backup and Sync not Working
These are the following steps that you must follow to solve Google Backup and Syncing issues. We will also look upon a few resolving processes that are related to Windows Firewall and its security applications.
Pause Data Backup Process
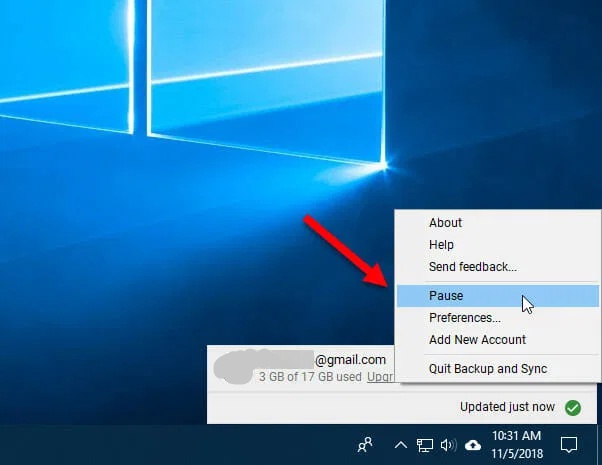
According to many users, pausing the “Backup and Sync” process and then restarting it has helped to resolve this issue. We suggest you do the same. Just select the “Backup and Sync” icon, which is present on the bottom-right side of the taskbar.
Note: The icons might be hidden in the system tray, so click on the upward arrow to reveal the icons.
Then you will have to click on the three-dot icon that will show the “Pause” option. The changes might take effect after a few moments.
Now, when you see the “Resume” option, be sure that the backup and sync process is in pause mode. After that, check out the items that are syncing in Google Drive.
Restart Backup and Syncing Procedure
We came to know that closing the “Backup and Sync” procedure and again starting it has helped many users when Google Backup and Sync do not work. In order to try it, access the system tray and select the Sync icon.
Then right-click on it and choose “Quit Backup and Sync” option. Whenever you want to restart it, just click on the Cortana search bar and type “Backup and Sync”.
Thereafter, click on the icon to start the syncing process once again. After starting it, the icon will be visible on the system tray. Now, spare some time for the application while it synchronizes itself. Lastly, check whether the problem is still there or not.
Uninstall and Reinstall Backup and Sync
Sometimes, you might notice that Google Drive not syncing on Windows 10. This can occur because of an old or corrupted version of the Google Drive application installed in your system. To rectify that, you must uninstall the old version and then install a new version. To do so, follow the steps given below.
- Press the Windows logo+I key to open Settings. In the same dialog box, click on the “Apps” menu and then select “Apps & features”.
- After that, you will find a search box present there. So, type “backup” and the “Backup and Sync from Google” application will appear.
- Click on the “Uninstall” button to remove it completely. After the uninstallation process is successful, restart your computer.
- Download the latest version of the “Backup and Sync” application and install it.
Hopefully, uninstalling the “Backup and Sync” application will help you to solve the issue.
Choose the Correct Google Account
Many of us make use of multiple Google accounts for our work purposes and personal reasons. Due to this, you need to verify and make sure that you are using the correct Google account while syncing the Drive.
The most important thing is to use the same account for backing up and syncing purposes that you have logged in.
If you want to add or remove any other accounts, then click on the “ Backup and Sync” thumbnail icon to see with which Gmail id you are logged in. However, you don’t have to remove your old account in order to add new ones.
Note: If you cannot find your old account, then add it by clicking on the “Add Account” option.
In case, if you want to use every Google account, you can create a separate folder for it.
Synchronize Folder Settings
Performing “Backup and Sync” from Google drive has built-in sync settings. It assists you to choose particular folders so that those folders and files can synchronize with each other. This activity is very much useful for syncing large folders from your computer.
To change the settings in your Sync folder, just follow the instructions below.
- Click on the “Backup and Sync” thumbnail icon and choose “Preferences” from the menu.
- Select Google Drive that is present on the left side. Next, choose both options “Sync My Drive” and “Sync My Everything” by clicking on the radio button as well as the checkbox.
- When you are using “Sync only these folders” option, then be sure that the particular folder that is not yet in sync mode is already selected.
Then, click on the “OK” option and save the settings.
Check Firewall Settings
Firewalls are present not only in Windows 10 but, also in every Operating System. It gives your device protection from unauthorized access, viruses, cyber-attacks, phishing links, and many more. But sometimes, the firewall blocks the “Backup and Sync” process that is running normally.
To make some necessary changes in the Firewall settings, go through the steps below.
- Open “Settings” on your system by pressing the Windows logo+I key. In the search box, type “Firewall” and “Allow an app through Windows Firewall” option will automatically appear in the drop-down list.
- Click on the option and then hit the “Change Settings” button. After that, click on “OK” to save the changes.
If you are using security software, then you must verify and check its settings whether it is blocking your “Backup and Sync” function. Moreover, ensure that this feature is in the whitelist.
Run as System Administrator
There can be authentication issues due to which Google Drive is unable to sync on your Windows 10 Operating System. It is because of the absence of Administrator rights given to Google Drive.
You must keep in mind that Windows allows us to create multiple accounts, each having a different level of rights.
To run your “Backup and Sync” application as Administrator, just follow the steps given below.
- Click on the Cortana search bar and type “Backup and Sync”. The application will appear on the top.
- Right-click on it and select the “Run as administrator”. This will allow Google Drive to have full administrator rights and permissions.
Now, hopefully, the backup and syncing process will run smoothly on your system.
Make Changes in Proxy Settings
When you are using a proxy to connect to Google Drive, a problem might arise if the sync feature is unable to turn on. To rectify this issue, click on the “Backup and Sync” thumbnail icon on the taskbar and choose “Preferences”.
Now, select the “Settings” option that is present on the left-hand side of the preference dialog box. Then click to open the “Network Settings”.
In the “Network Settings” dialog box, click on “Direct connection” and hit the “OK” button to save these changes.
Remove Desktop.ini File
In case, Google Drive is unable to synchronize your computer, it results in causing an error in a particular file known as “Desktop.ini”. This file is hidden by default in your Operating System. When Windows generates this file, then Google Drive is unable to synchronize anything that you add.
This process of sync failure continues unless you resolve this error. To resolve it, open the Windows Explorer and go to that particular folder in which the files are not syncing.
If you want to find the hidden files, then click on the “Options” button that is present under the “View” tab. Now hit the “Change Folder” and select the “Search” option.
Thereafter, click on the “View” tab and select the “Show hidden files and folders” radio button. Then, click “OK” to save changes.
Now, go back to the previous folder and try to find out the “desktop.ini” file. If you locate it, delete it immediately. Then restart your computer and try to sync your Google Drive once more.
Check and Reduce File Size, Name, and Length
15 Gigabytes of storage is set by default in Google Drive by the developers. Before syncing any file you must check and make sure that there is enough space for the synchronization process. If you want to check the available storage space, click on the “Backup and Sync” option present on the system tray.
However, there might be a few files that you want to synchronize, which contains a long name exceeding more than 255 characters. If this occurs, then you might face this syncing problem in Google Drive.
Note: Microsoft doesn’t allow any sort of files or folders with longer names exceeding the character limits.
In this case, you will have to change the name of the particular files or folders and make it a shorter one.