Installing Windows takes time and it’s a delicate process, a single error can lead to a repetitive restarting process. But, if Windows could not complete the installation, there are obviously some vital reasons behind it. Get to know the causes, only then the troubleshooting steps would prove to be effective.
Some of the possible reasons are corrupted disc image OS file, the bootable storage device is not prepared properly, malfunctions in the recovery mode and the BIOS and others. There are basically two types of installation mode – One is the Windows Welcome mode and the other is Audit mode.
Table of Contents
The Audit Mode: Details
The Audit mode is nothing but a simple working environment based on the network where you can easily customize, as well as add Windows images. When the installation is complete, you can see the welcome screen. There is also a facility of skipping the welcome screen and entering directly into the Audit mode. The Audit mode actually helps you to boot the OS directly to the desktop after the entire installation is complete.
How to Troubleshoot the Issue?
Every troubleshooting method that is given here will be useful for you. If you try either one of them, then definitely it will work out. Without wasting any time, let’s check them out:
-
Complete the Installation Process
Regarding the incomplete installation, you need to take the assistance of the bootable storage device once again. Insert the device into your computer and restart it. When the system prompts you to press any key to boot from CD or DVD, press any key from the keyboard. You will get two options: “Install Now button” and “Repair your computer”.
Click on it to open the “Choose an option blue screen” window. Three options are — Continue, Troubleshoot, and Turn off your PC. Select the Troubleshoot and choose the Advanced options. At last, select Automatic Repair and wait for the process to complete. After that, try to install the OS once again.
-
The Administrator Account Activation
The administrator account of your computer grants all the permissions of application access. When Windows could not complete the installation, the administrator account might not be active, you need to turn it on. Typing MMC and pressing Enter with the help of the Command Prompt can be effective. Now, the Console Root window will appear on your computer screen.
Move to the File and select “Add/Remove Snap-in…” to choose Computer Management. The Local Computer radio button is present, and you need to click on it and finish the Task. You can also assign a password for more protection to your computer.
-
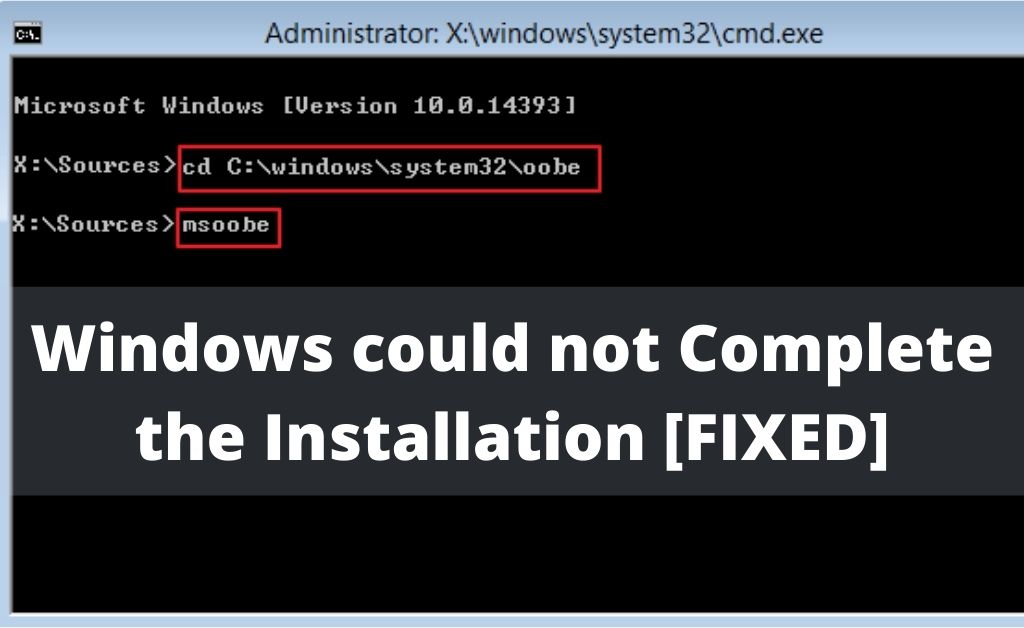
Initiate the Account Creation Wizard
Just type “C:\windows\system32\oobe” in the Command Prompt. Press enter key and once again type “msoobe” without any quotation marks. Both of these commands will help you to create the account wizard. If the process needs the OS product license key, then apply the correct key to continue the process. Now, you can try to install the OS, once again.
-
Fixing the Registry
The registry plays one of the key roles in the installation of the OS. If there are any errors in the system registry, then Windows could not complete the installation. As usual, open the Command Prompt and type “regedit”. When the next line appears on the screen, the editor is now open to receive more commands.
Type “Computer \HKEY_LOCAL_MACHINE\SYSTEM\Setup\Status”. If you want to change the value, then once again, input all the following commands that are given below:
HKEY_LOCAL_MACHINE\SYSTEM\Setup\Status\AuditBoot
Value: 0
HKEY_LOCAL_MACHINE\SYSTEM\Setup\Status\ChildCompletion\setup.exe
Value: 3
HKEY_LOCAL_MACHINE\SYSTEM\Setup\Status\ChildCompletion\audit.exe
Value: 0
HKEY_LOCAL_MACHINE\SYSTEM\Setup\Status\SysprepStatus\CleanupState
Value: 2
HKEY_LOCAL_MACHINE\SYSTEM\Setup\Status\SysprepStatus\GeneralizationState
Value: 7
HKEY_LOCAL_MACHINE\SYSTEM\Setup\Status\UnattendPasses\auditSystem
Value: 0
Now, the computer restart will help you to clear the registry. In addition to that, the Audit mode will also get disabled and the OS will start normally. You can try out the Windows reinstallation with the bootable storage device.
-
Creating an Emergency Partition Wizard
It will be a fruitful task to create an emergency partition wizard when Windows cannot complete the installation. A safe and secure third-party application can help. Before creating a partition, you must look for more than 100 GB of free space in the hard disk drive. After creating the emergency partition drive, keep a backup of the data.
Further, a bootable Pendrive provides a better and faster installation speed. When you encounter any types of errors, then leave aside the bootable disc drives and opt for the bootable pen drives. When Windows could not complete the installation, you have to be more concerned about the disc image file and also make sure that there is enough space available.