 Are you fading up with the automatic updates of Windows 10? Want to know how to stop Windows 10 update? Then this guide can help you to get rid of the problem effectively.
When you are going to shut down your computer, you might be forced to update your device. But for many reasons, you want to stop this feature from your device. We hope that this is quite frustrating for you.
If you turn off this Auto Update option, then it will not ask you from upgrading the updates in the future. So, keep reading the entire article and follow the steps exactly stated below.
Table of Contents
Want to Stop Windows 10 Update? Do As Mentioned Below
Do you want to postpone the updates of your Windows 10? In that case, you don’t need to disable the feature permanently.
Apart from this, you can pause the updates for a certain time as per your wish. But if you want to stop the Auto-update option completely, then track the solutions stated here.
Solution 1: Disable All Updates
 For disabling the updates temporarily, you have to turn off the “Disable Automatic Updates” option from your Windows 10 device.
- The very first thing you have to do is to launch Settings from your system.
- After that, find the Update & Security tab and click on it.
- Now, choose the Windows Update icon and tap on it.
- Then, move to select the Advanced option from the Windows Update menu.
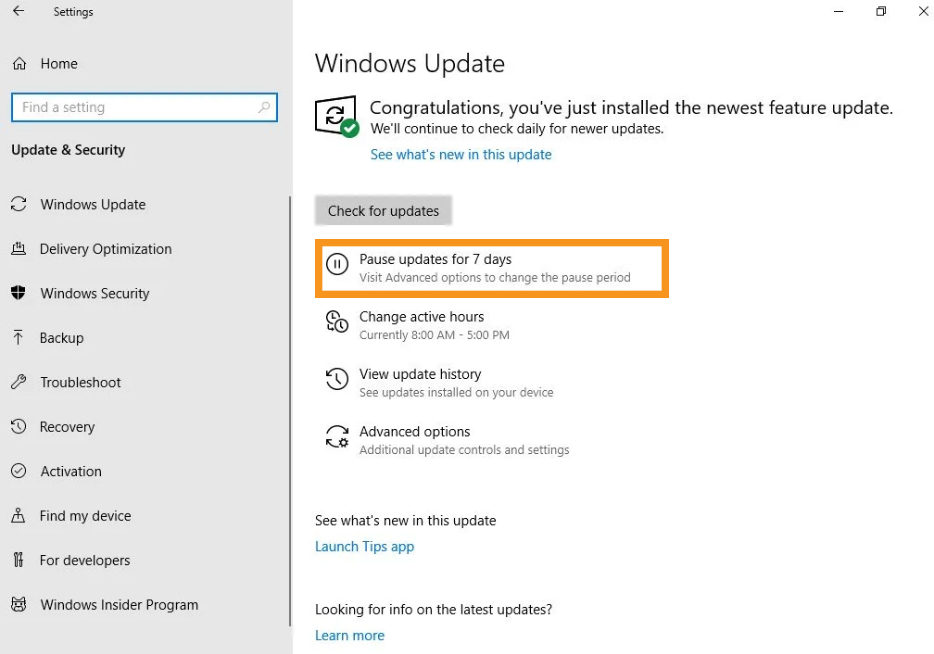
- Here, you will notice the “Pause Updates” option.
- By using the scroll-down menu, click on Pause.
- Also, select the time for how long you want to turn off the updates.
- After completion of the above steps, your device will no longer force you to update your device until the dates you specified before.
- But remember that when your system reaches the pause limit, you will be asked to install the latest updates.
Solution 2: Disable the Security Updates
 By disabling the Security Updates, you can stop the updates for thirty days. Here are the processes to do so.
- At the initial step, open Settings from your system. Then navigate to the Updates & Security option.
- After that, find the Windows Update icon and tap on it.
- Now, from the next page, choose the Advanced icon.
- Navigate to the Pause Updates section and from the option list, choose Pause.
- Here you can select the time for how long you want to pause the updates. So, choose 30 days and you will no longer receive the updates.
Solution 3: Disable Automatic Updates Using Group Policy
 By using the Local Group Policy Editor, you can disable the Auto-update feature permanently from your Windows 10. Execute the processes exactly in the same manner as stated.
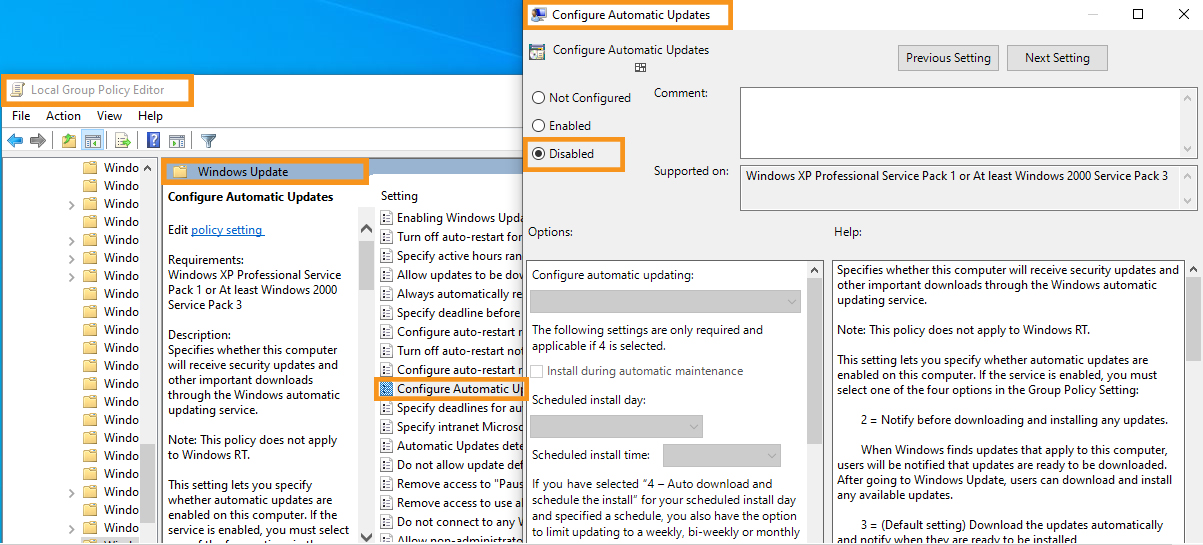
For permanently disabling the updates, at first, you have to navigate to the Start option and click on it. After that, find the “gpedit.msc” and open it. Now, go to the following path
Computer Configuration\Administrative Templates\Windows Components\Windows Update
Then, look at the right side of the screen and select the Configure Automatic Updates tab by double-clicking on it. Here, you have to choose the Disabled option and switch off the policy. Now, tap on the Apply button and then OK to save the changes that you just have just made.
If you in the future want to install the updates, then navigate to the Settings app and tap on Updates & Security. Then, click on Windows Update for the next page. For checking the available updates, click on “Check for Updates.” From there, you can install them.
Solution 4: Turn off the Windows Update Service
 Once you turn off the Windows Update Service, you can not receive any notification for downloading any updates. But to do so, you have to uninstall Windows 10 Update assistant if it is installed in your system.
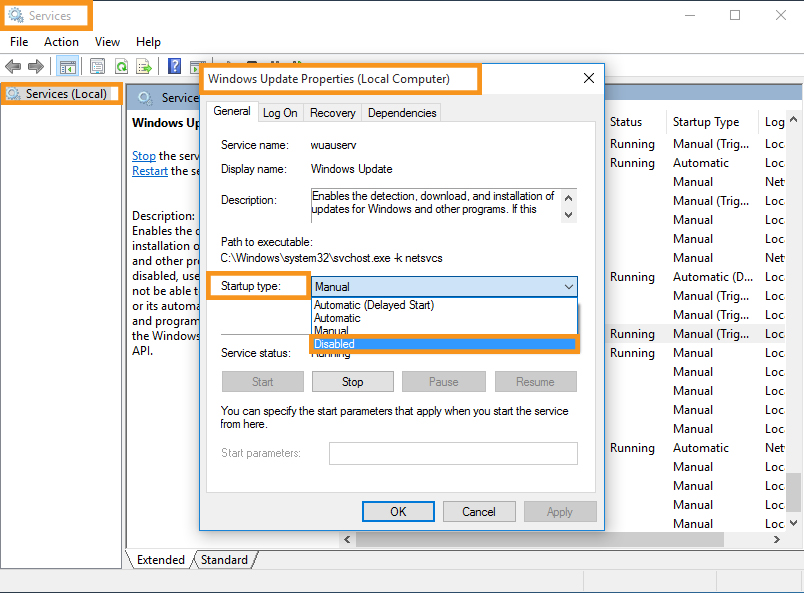
- First of all, press down the Windows logo button and the R at the same time on your keyboard to open the Run dialog box.
- After that, click on the box and write down services.msc in it.
- Then, hit the Enter button and move down to find the Windows Update section.
- Just select Windows Update by double-clicking on it.
- After that, click on the Startup Type section and choose the Disabled option.
- After changing the steps, tap on Apply and then OK. It will save the changes you have made.
- At the final step, restart your device and check if the error still appears or not.
Solution 5: Meter your Internet Connection
 Before going to perform this solution, you have to keep in mind that if you are using an ethernet connection, then ignore this step. Hence, at first, check if your computer is connected with a WiFi connection or not.
- At first, navigate to the Start button that is located on the left side of the screen.
- After that, tap on the Settings option and find the “Network & Internet” option.
- Click on “Network & Internet” and look at the left pane of the window.
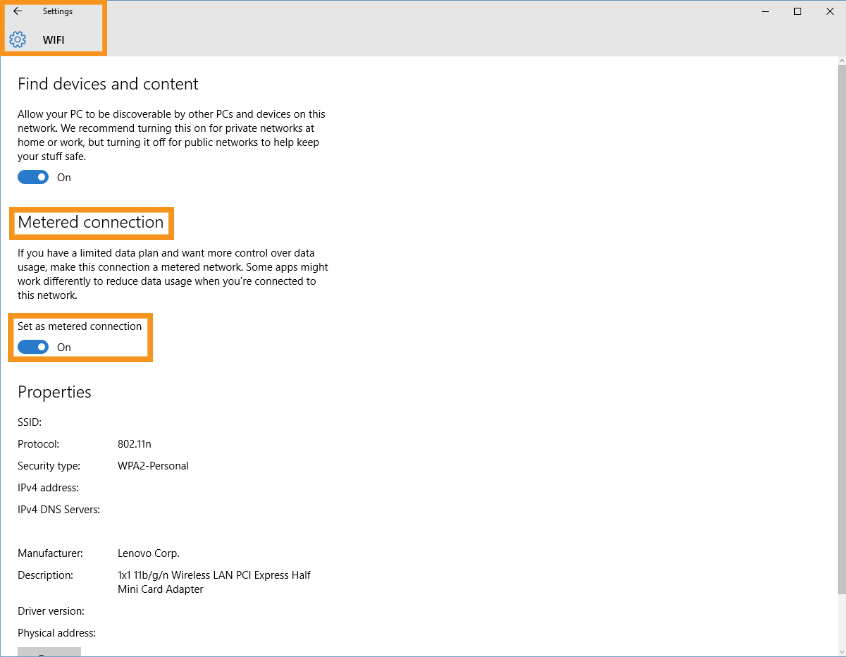
- On this page, choose the name of your WiFi connection by clicking on it.
- Then, switch on the Metered connection. Finally, restart your device and check if you successfully disable Windows 10 update or not.
Solution 6: Change the Way of Updates Using Registry
 Though editing the registry is quite risky, it can help you to disable the updates on your Windows 10 device. But before proceeding with the steps, you have to be sure that you have already created a backup of all the important data that are stored in your device.
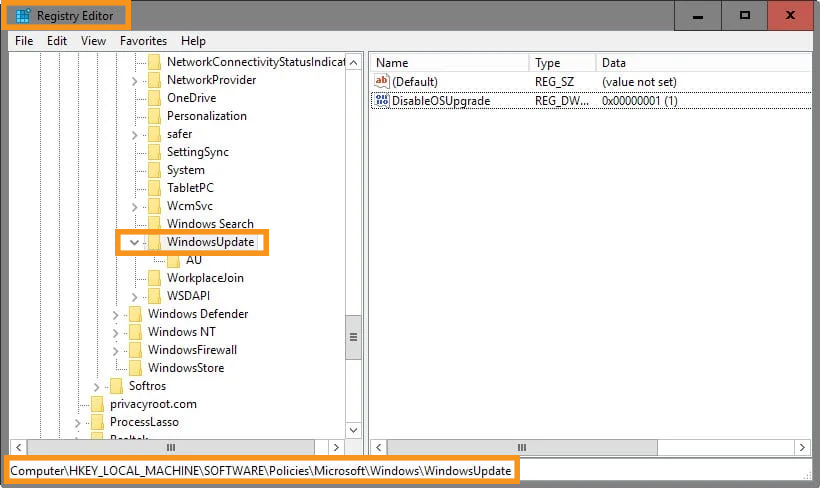
The very first thing you have to do is to press the Windows and the R button at the same time and launch the Run command. After that, click on the box and type “regedit” and press the OK option. It will launch the Registry and you have to follow the path
HKEY_LOCAL_MACHINE\SOFTWARE\Policies\Microsoft\Windows
Now, choose the Windows folder by right-clicking on it and tap on the New option. Select the Key option and rename the key as “Windows Update”. Hit the Enter button and find the newly created key. Tap on New and again, click on the Key option.
Again, rename the key AU and hit the Enter button. Now, name the key as AU Options and press the Enter button. Here, you have to change the value to 2 and click on OK. Exit the Registry and check if you stop the updates from here or not.
All the above solutions are reliable if you want to learn how to stop Windows 10 update. But in case you have any further queries, then get in touch with experts and take more advanced solutions from the professionals.