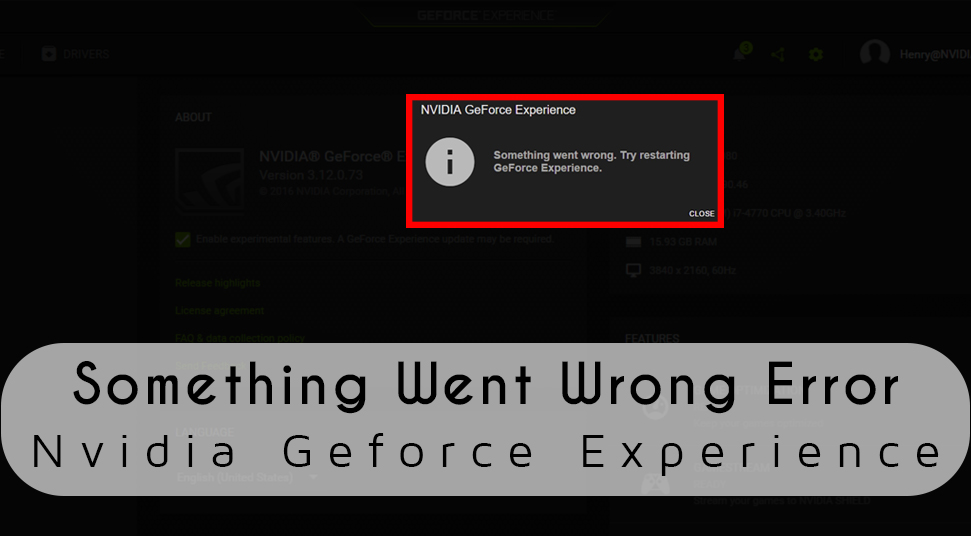
 If you are a gamer, then you definitely know what NVIDIA’s GeForce Experience software is. With the help of this user-friendly software, you can configure the optimal settings for your PC’s graphics hardware.
Sometimes, the application might crash or might not be working then you can face such issues. Corrupted installations are also one of the main reasons that can lead to this error. Because of the outdated graphics card, you might encounter this error.
Updating DirectX can fix this issue. Geforce experience something went wrong being a common technical issue, you can resolve it with a few manual tweaks.
Table of Contents
Possible Ways to Fix Nvidia GeForce Experience Something Went Wrong
Below discussed are the effective solutions that you can implement on your own to fix the “Geforce experience. Something went wrong”.
Solution 1: Make Sure to change the Compatibility of the GeForce Experience
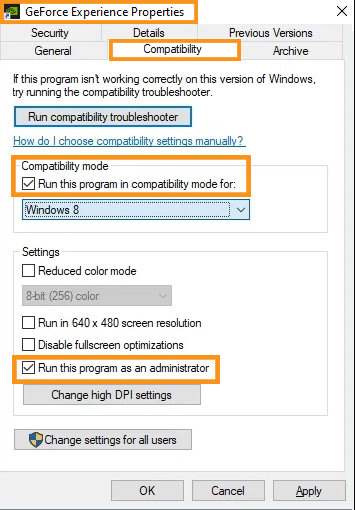 If the program is not compatible with your PC, then you might face the error message “something went wrong, try restarting GeForce experience”. To fix this error, you need to change the compatibility of the GeForce Experience.
- First, go to the GeForce Experience application and choose Properties.
- After that, head over to the Compatibility tab to check both the options: “Run this program in compatibility” and “Run this program as an administrator”.
- With the help of the drop-down menu, you can select various operating systems.
Solution 2: Stop all GeForce Tasks
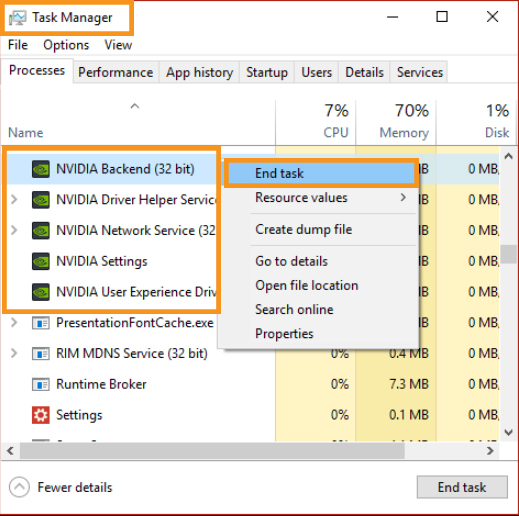 To fix this error, you need to stop all the GeForce tasks and then make sure that you relaunched the GeForce Experience.
- Initially, open the Task Manager and for that press the Shift, Ctrl, and Esc key at the same time on the keyboard.
- Thereafter, select all the running NVIDIA tasks and then click on the End Task option.
- Finally, go to the GeForce Experience app icon and then click on the “Run as Administrator” option. Check whether the error still persists or not.
Solution 3: Activate NVIDIA-Related Services
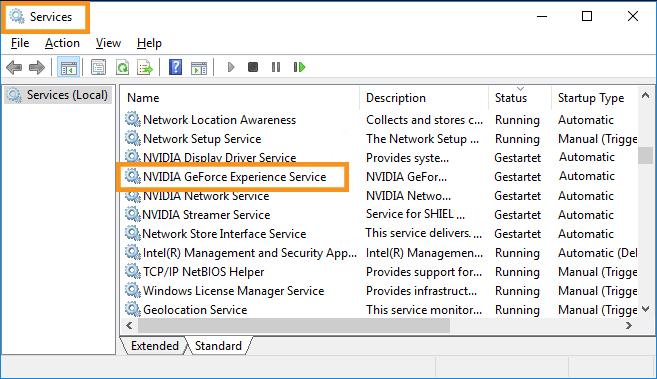 Activating NVIDIA-Related Services can fix this error. Go through the following steps to activate the NVIDIA-Related services.
- Press the Windows key and R at the same time on the keyboard to launch the Run dialog box. After entering “services.msc”, click on the OK option.
- Go to the list and click on the NVIDIA Geforce Experience Service and then from the Context menu select Start.
- Sometimes, you might not see an option that starts the service. Then, select the Restart option.
- To save changes, click on the Apply and followed by the OK. Select the option “Nvidia GeForce Experience Backend service” and “Nvidia Display Container service”.
- Next, from the options list, select the Start or the Restart option and followed by the Properties option.
- Sometimes, you might find that the service is active. Then, click on the Stop option.
- Now, save the change and for that click on the Start and Apply option simultaneously.
- Head over to the Log tab to click on the Local System Account. In the end, click on the Apply and then Ok option simultaneously.
Now, open NVIDIA’s GeForce Experience to check whether the error message still persists or not.
Solution 4: Change “NVIDIA Display Container LS” Settings
 You might be unable to open the GeForce Experience as the NVIDIA Display Container LS has not started. If the Startup type is disabled, then change the service’s settings.
- Go to the dialog box and press the Windows key and R at the same time on the keyboard. Then type “services.msc” and hit the Enter button.
- Now, head over to the services, select the “NVIDIA Display Container LS”, followed by the Properties option.
- Go to the Startup type and click on the Automatic option. To save the changes, tap on the Apply option.
- Now, the service needs to force start and for that right-click on the service and then choose the Start option.
- Tap on the Windows key and R at the same time on the keyboard and enter “msconfig” and then hit the Enter button.
- Head over to the Services tab to check the line “Hide all Microsoft services”. Now, make sure that all the Nvidia related services are checked.
- To save changes, press the Apply button. In the end, reboot your PC to open the GeForce Experience again and check if the problem is fixed or not.
Solution 5: Reinstall the GeForce Application
 If you face this error, then re-install the GeForce application. Before doing that make sure you have downloaded a fresh version of the GeForce.
Go to the official website of GeForce to download the latest version of this application. To reinstall the GeForce, perform the following steps.
- First, tap on the Windows key and R at the same time on the keyboard.
- Then, go to the dialog box to enter “appwiz.cpl” and then hit the Enter button.
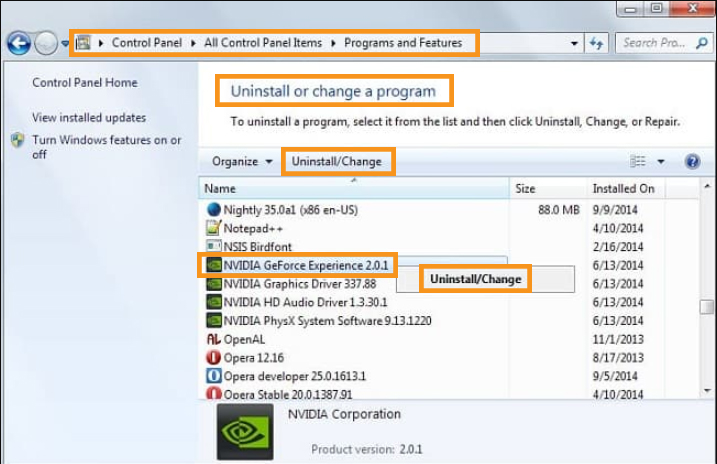
- Open the “Programs and Features”. Go through all the applications until you find the GeForce Experience.
- Right-click on the application and then tap on the Uninstall option.
- Then, go to Nvidia’s official website to download the latest version.
Note: You might be unable to install the latest version of this application without administrative privileges.
Solution 6: Update the Graphics Driver
 If the graphics driver is not configured properly, then you might come across this error. Sometimes, you might face this error due to an outdated driver.
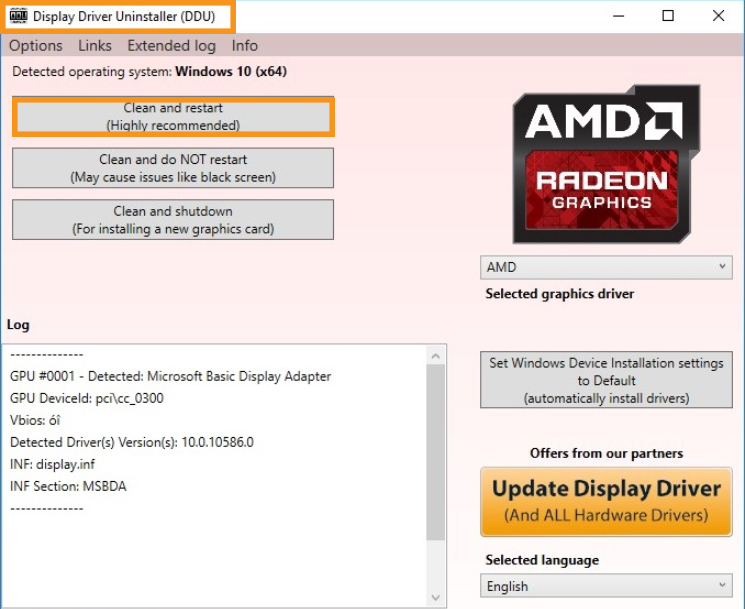
- When you install the Display Driver Uninstaller or the DDU, then make sure you open the PC in the Safe Mode.
- Now, you need to launch the application that you just installed and then open the PC in Safe Mode.
- Next, choose the “Clean and Restart” option. Restart your PC into the Normal mode and then open the application.
- After opening the “Drivers” tab, click on the “Driver Download” button.
- On the right side of the screen, you need to enter the specification. Now, search the optimal drivers for your PC using the “Start Search” option.
- When the driver is updated, reboot your PC in order to check if the error persists or not.
Hopefully, these above solutions will be able to eradicate the Geforce experience something went wrong without any hassle.